Home Assistant control with Alexa
In my point of view Alexa is still one of the better voice assistants out there. My personal choice was primarily influenced by the number of different devices that support Alexa. I own a lot of SONOS speakers, since the early days of SONOS.
While deciding between Google and Amazon for those boxed my vote fell on Alexa mainly due to Skill functionality Amazon is providing. Lately Home Assistant published its own voice assistant and SONOS also added its own voice assistant to the setup. This will probably end up in a different post some other time.
In the this post we are taking a look into the best way to integrate Home Assistant into Alexa. We want to control a selected number of entities in Home Assistant with Alexa voice commands anywhere in the house.
Out of scope integrations
Alternatives to Alexa Skill interfacing
Alexa integration into Home Assistant
There are multiple ways to enable interaction between Alexa and Home Assistant. If there are device already integrated into Alexa but are not integrated into Home Assistant you might want to have a look into the Alexa Media Player.
We will not cover this here, but in short the customer component allows controlling of devices that are managed in Alexa. In my case all devices are already in Home Assistant and as mentioned earlier even my Alexa Speakers are really SONOS speakers.
Home Assistant integration into Alexa via Nabu Casa
The easiest way to allow Alexa voice commands control over Home Assistant is to use the existing cloud solution by NABU CASA. All the traffic will be handled by the NABU CASA cloud as opposed to AWS and the Amazon Skill.
However, this is a subscription based solution. If you are fine with paying a monthly fee for the service you might want to go this way. It involves way less manual configuration effort.

Home Assistant integration into Alexa
using a self created Alexa Skill
We will setup an Amazon Alexa Skill that will use an AWS Lambda function to communicate with our Home Assistant instance. Below is simplified chart showing how the communications will go. The Alexa Skill will be integrated as any other Skill into our Alexa.

Requirements
First we need to create an Amazon Developer Account. This quite straightforward following the the setup on Amazon. Make sure that the account use for Amazon developers is the same as the Amazon account used for Alexa.
Secondly we need an AWS account to use AWS Lamda. It will host a simple Lamda function to connect the Amazon Skill with Home Assistant.
The free tier service should be sufficient for most of the home use cases. You can execute up to 1 million requests or 1GB of outbound traffic per month.

Lastly our Home Assistant instance needs to be available on the internet via HTTPS. When using the proxies make sure the certificate is not self signed. Amazon requires a trusted certificate or the Skill won't work.
I am using Cloudflare tunnels to expose Home Assistant to the internet. In this case Cloudflare is also taking care of all the certificates. Setting up cloudflare zero trust networking is a topic for a new post I guess.
Lamda Function
We are starting with creating the Lambda function handling the traffic between Home Assistant and Amazon Skills. The next steps will be done inside the AWS console.
AWS Role
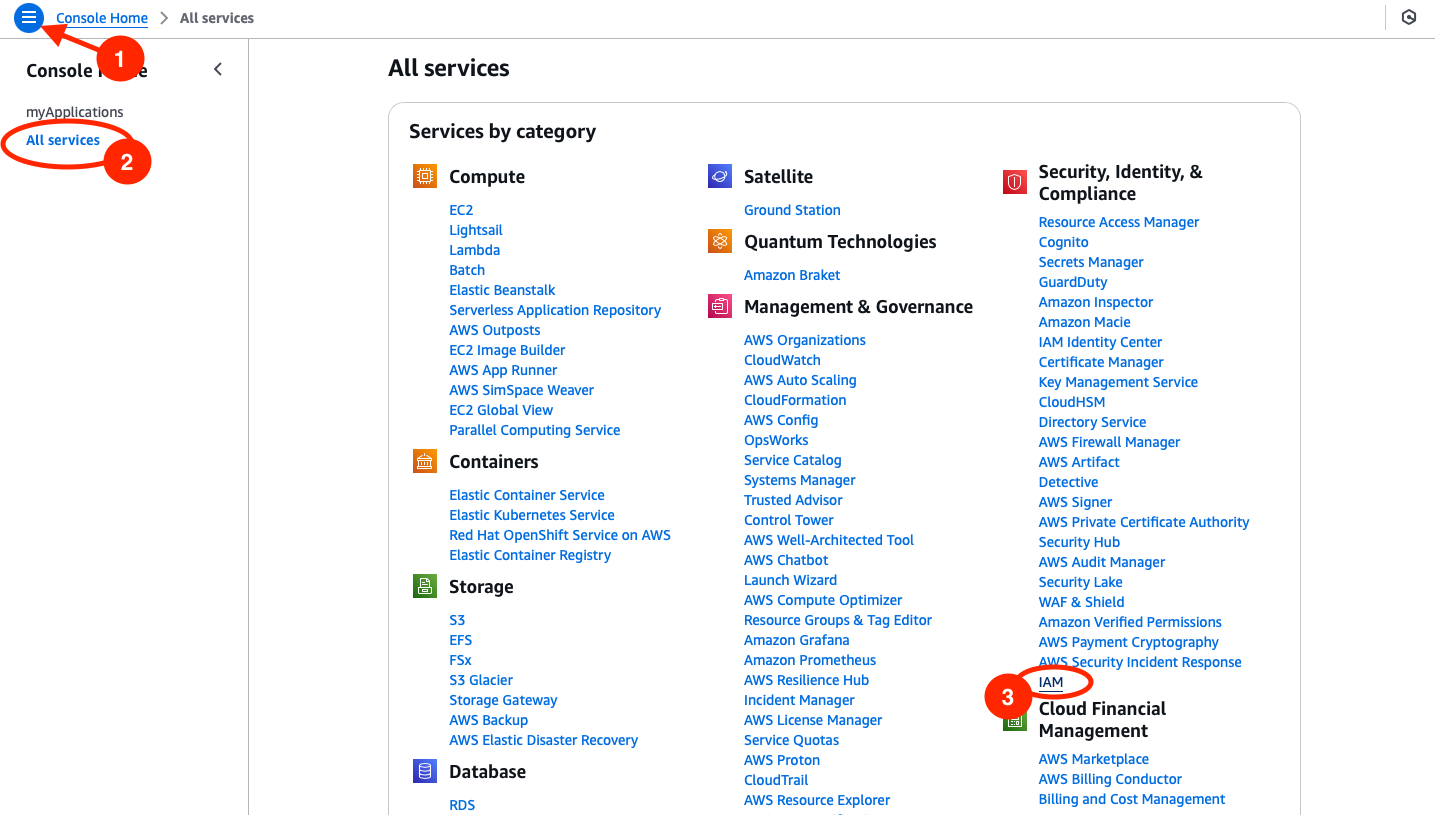
First we need to add a new role to AWS to authenticate the Lamda function execution. Head over to the Identity and Access Management (IAM).
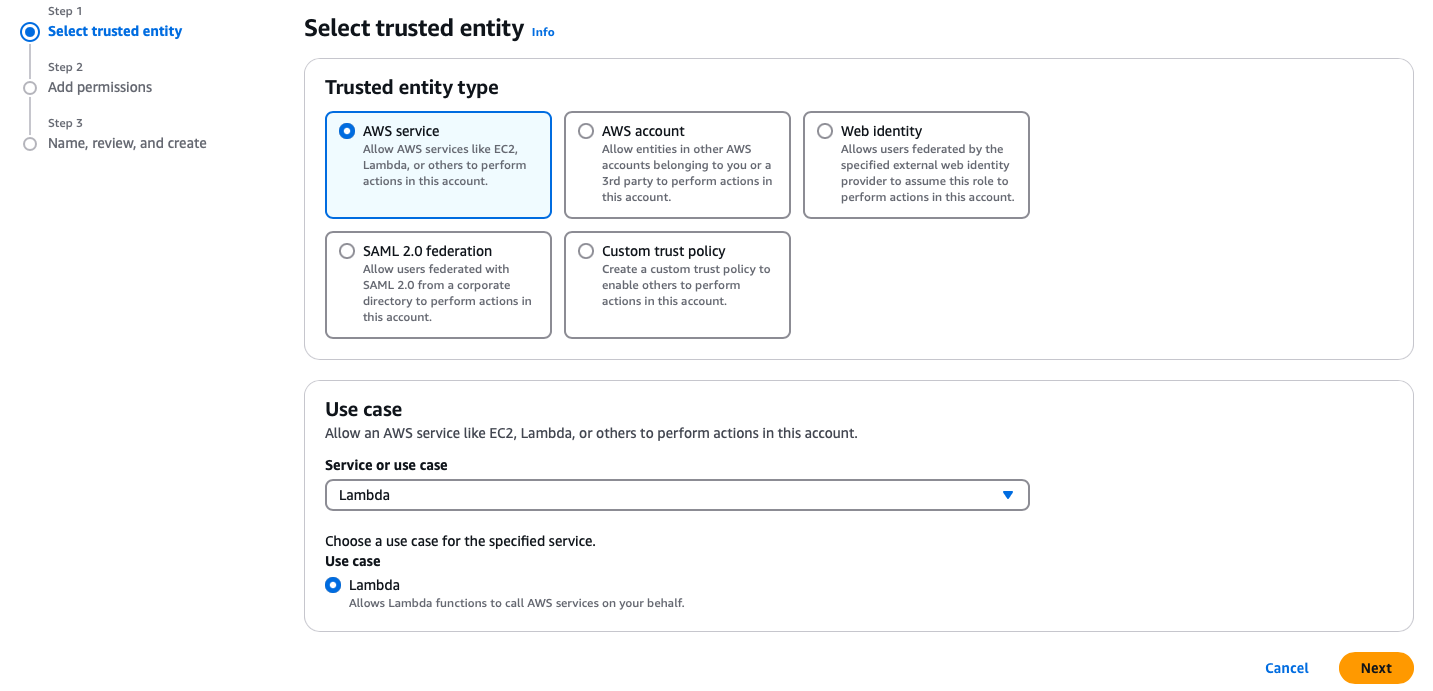
Next we are creating the role

The role will be create as an AWS Service for Lamda.
Next we are adding permission for AWSLambdaBasicExecutionRole policy. Since there are quite a lot policies to choose from, it easiest to search for above policy.

Lastly we are choosing a name of our liking such as HomeAssistant-LambdaExecutionRole and change the description - or not ;). Now you can review the steps 1 - 3 we did before and create the role.
Creation of the Lambda function
Go back to the Console Overview by clicking on aws in the top left corner and follow the previous steps to the Roles, but this time go from All Services to Compute and Lambda. Alternatively go there directly via the 9 small squares icon next to aws.
Make sure that you are on the correct server on the top right. Not all of the servers are supporting Alexa Skills. Depending on your chosen language and region the server is different for you. You can check the correct servers here. For me that is Ireland in the Europe region.

Give the function a name (I used HomeAssistantInterface) and select Python 3.9 as the Runtime Environment. Lastly change the default execution role to the one we create earlier.
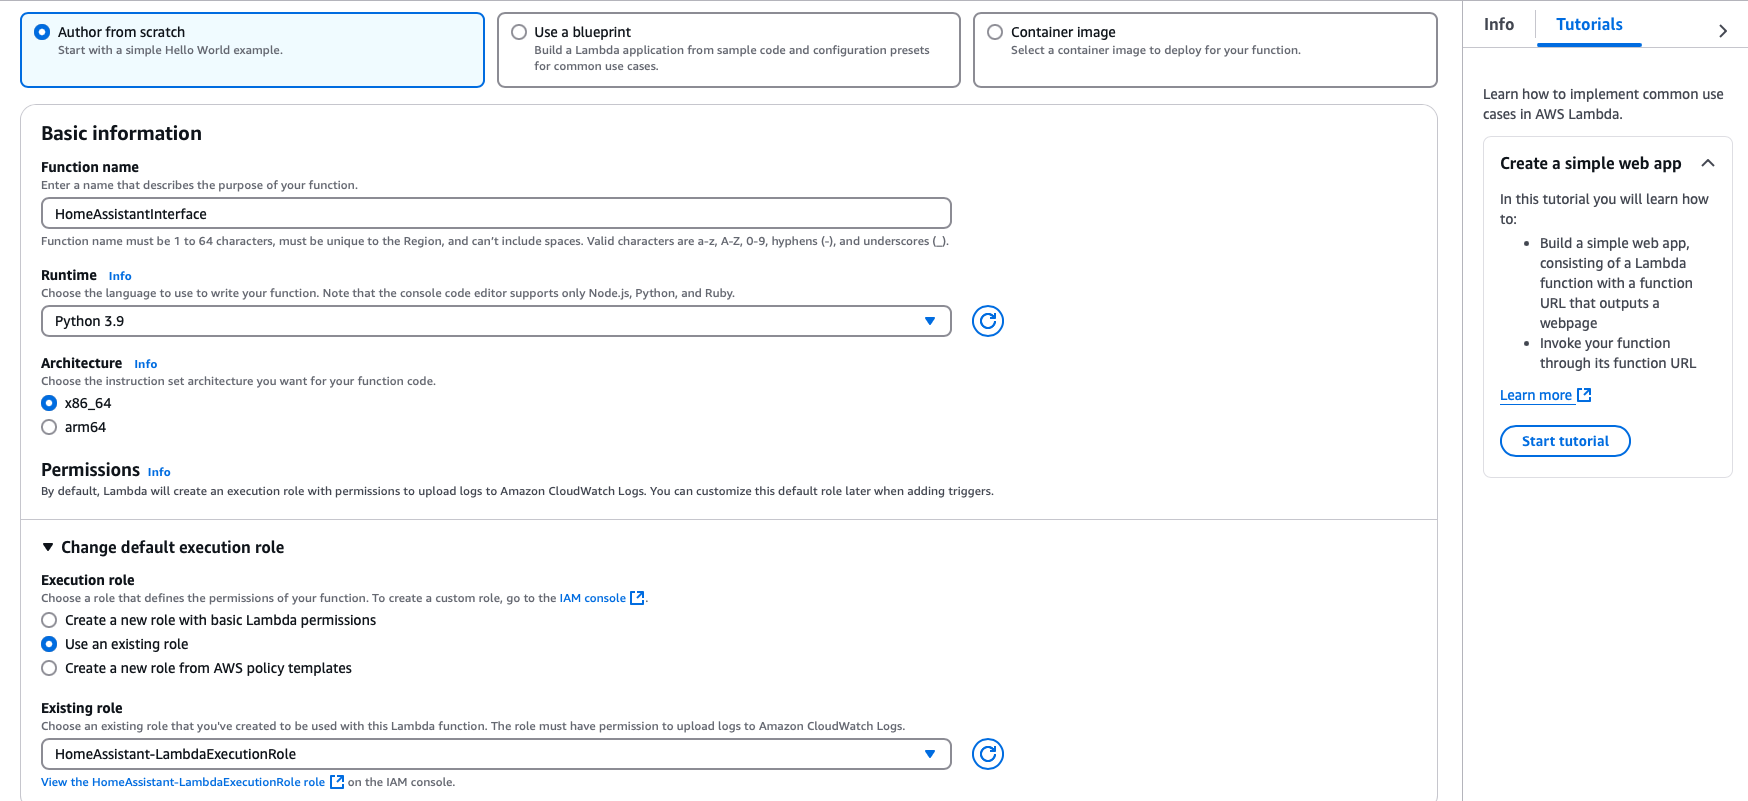
Now the function is created and the overview should look like this.

Next we are adding the code for our Lambda function. Clear all the code in the inline editor. We are not coding this ourselves. Luckily someone already provided the code. Check the code here and copy it in the Lambda function. It should look like this now. Click Deploy to update your Lambda function.
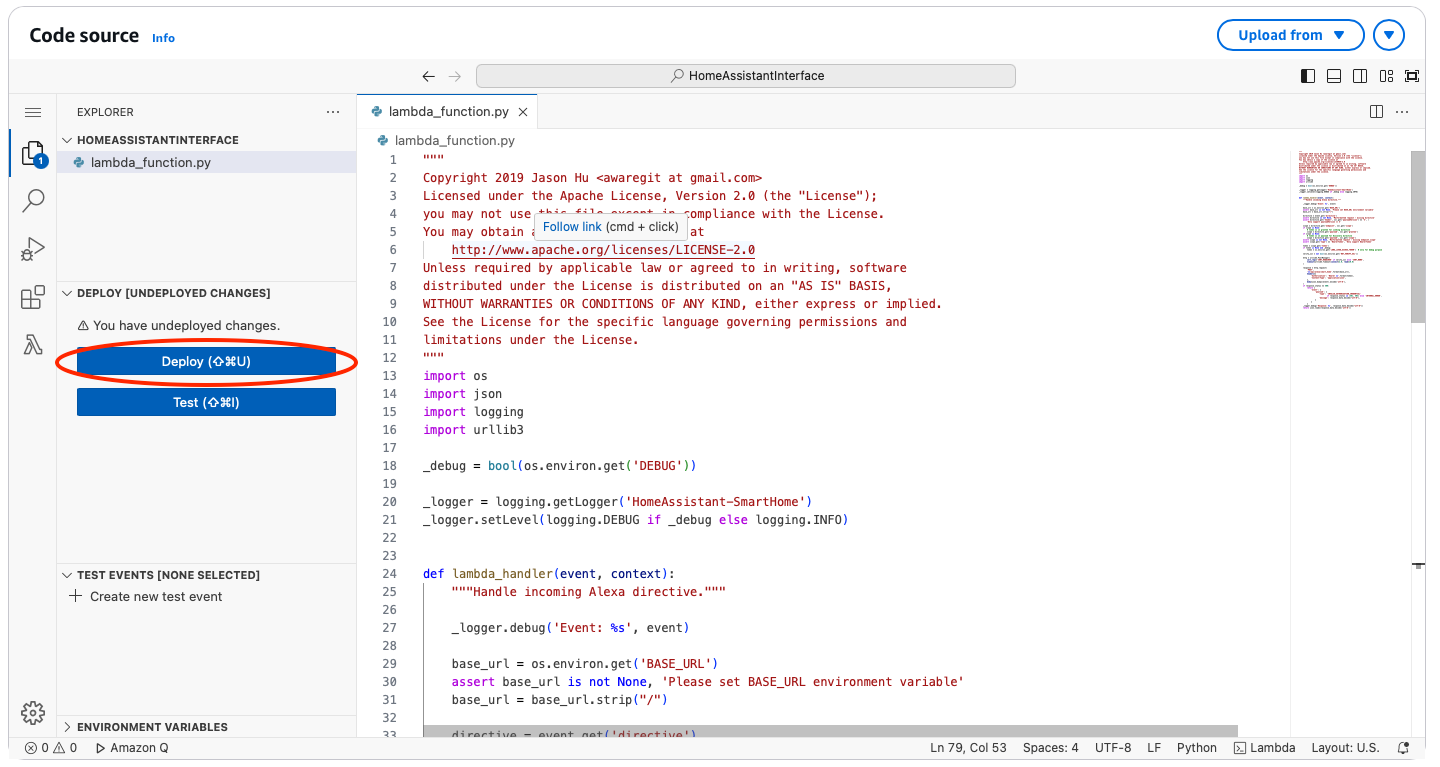
Now we are adding environment variables that are needed to execute the Lambda function. They contain information about our Home Assistance URL and authentication configuration for that.

Klick Edit to add new environment variables. After clicking on Add environment variable you can add as many as you want as KEY / VALUE pairs.

The following variables can (or must) be added:
BASE_URL = This is Home Assistant public URL, e.g. https://homeassistant.mydomain.de Keep in mind that you are not ending the URL with a /. The base url is the only environment variable that is mandatory. All of the next ones are optional and can be skipped.
Optional environment variables
NOT_VERIFY_SSL = True With setting this to true we would ignore any SSL issue that might arise. If you are unable to get a trusted SSL certificate you could use this to still be able to set up Alexa. However, I recommend to not set this and instead get a trusted certificate.
DEBUG = True This enabled debug messages and additionally allows the use of long lived access tokens.
LONG_LIVED_ACCESS_TOKEN = This contains a long lived access token created in the Home Assistant profile page.
We will still add the DEBUG and LONG_LIVED_ACCESS_TOKEN since we need it from time to time for testing. When they are not needed we can simply change the DEBUG value from True to False.
After saving the variables we can start creating the skill. We will come back to this site later.
Skill Creation
Let's create the Amazon Skill now. We will come back to the Lambda function later when we are connecting the skill with AWS. We need to log into the Alexa Developer Console. As already mentioned, the account needs to match our Amazon account that we want to use Alexa with later on.
We are navigating to Alexa Skill and hit Create Skill. This will bring us to the overview where we are entering a name as well as the default language we want to use Alexa with. I will leave that to the default English, but you can choose a you want. Click Next.
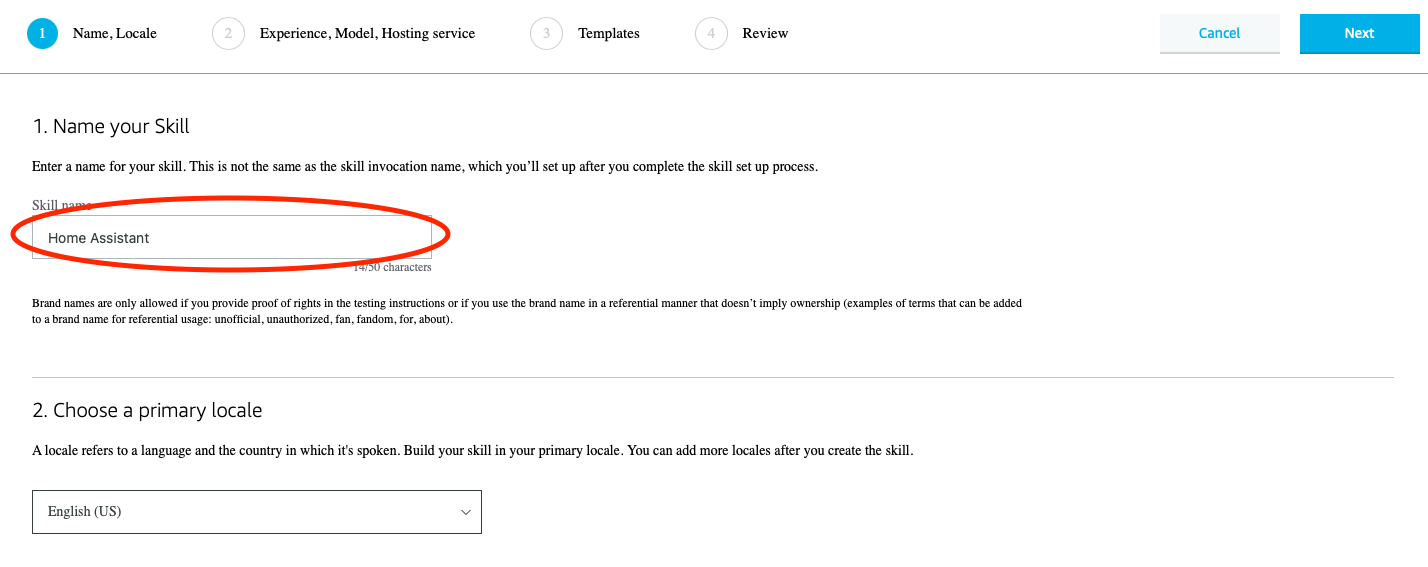
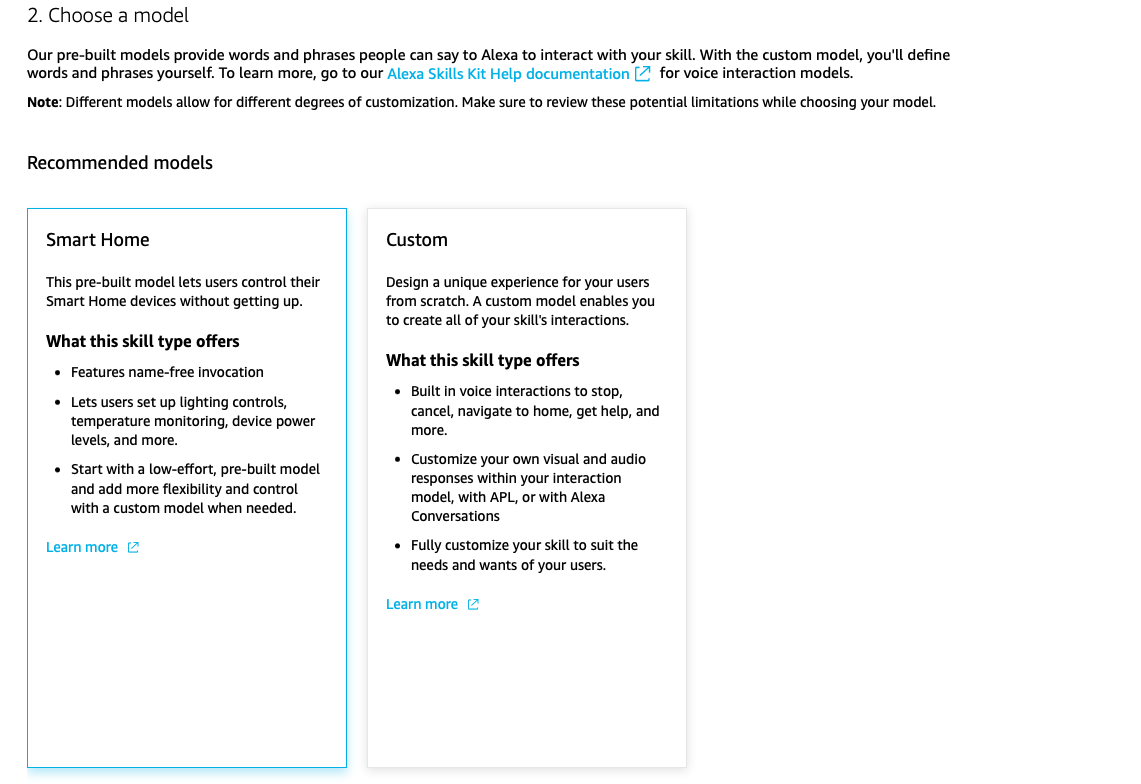
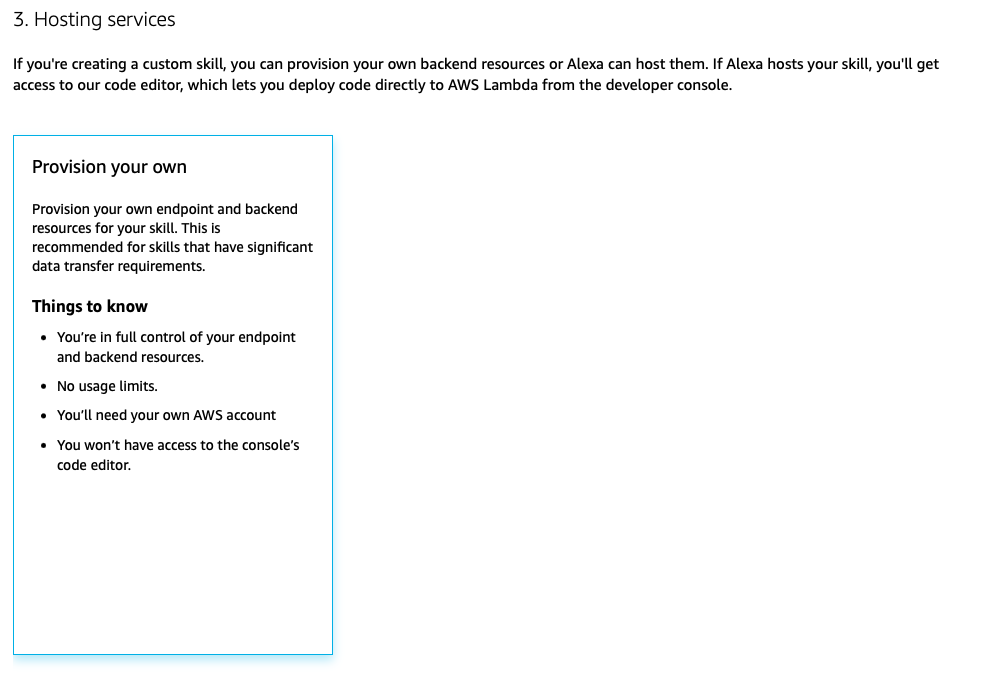
As a model we are choosing Smart Home with our own backend provisioning.

We are leaving the options for the model at Smart Home and Hosting Services at Backend Provisioning.
The next step bring us to the end point configuration and should look something like this. Choose v3 as the payload version.
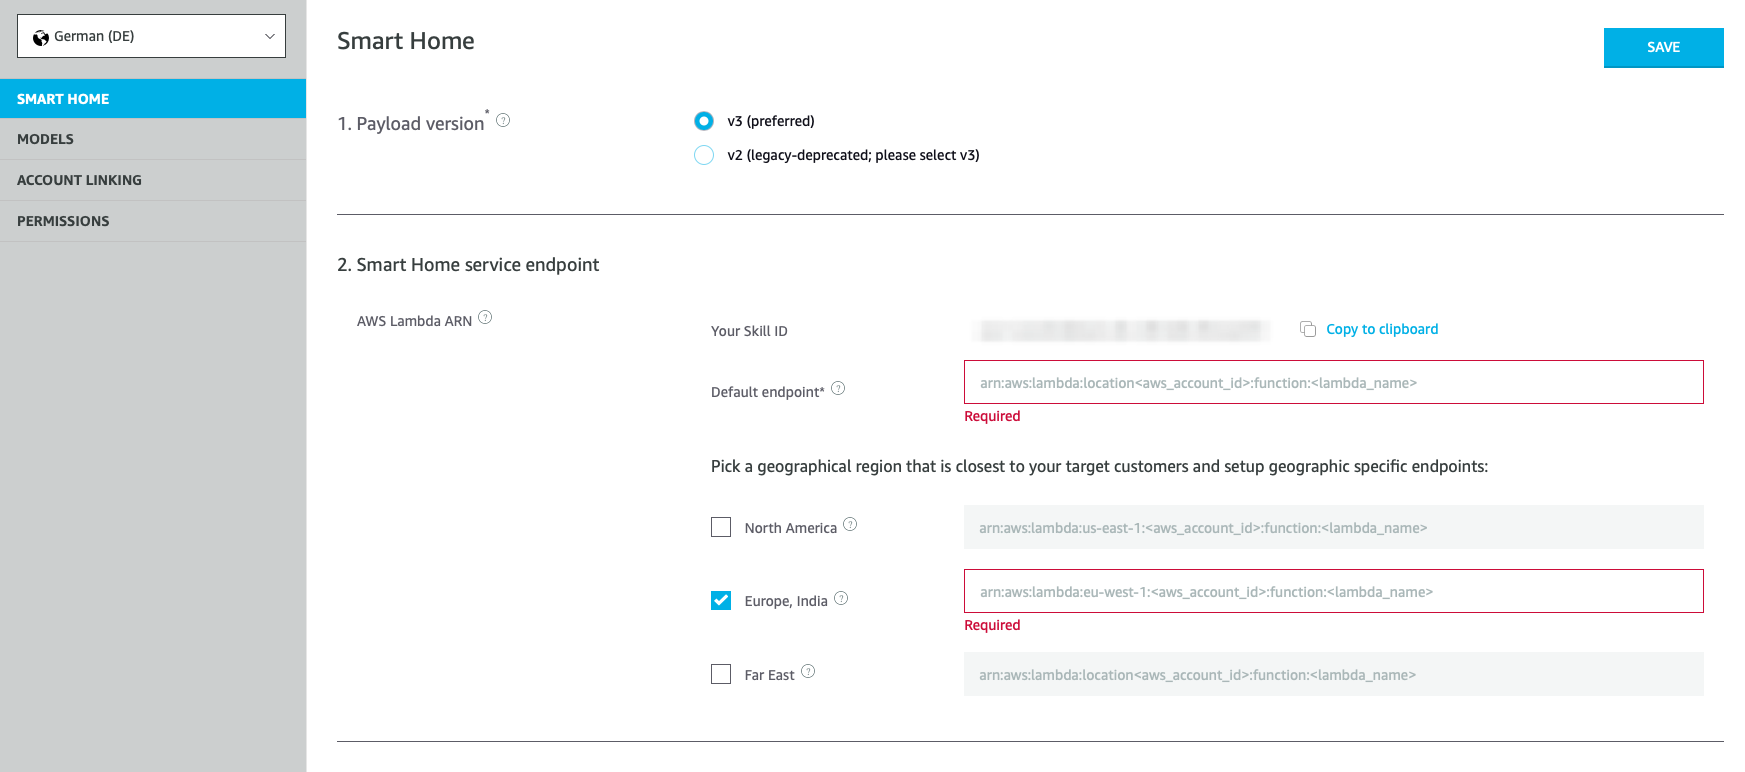
Putting all together
Now we are putting the Skill, the Lambda function and Home Assistant together and test the connectivity.
Connecting the Skill with the Lambda function
Now copy the Skill ID to your clipboard and go back to the Lambda function window where we left off. Add a trigger to your lambda function. This will bring you to this overview.

Choose Alexa as the trigger and make sure to select Alexa Smart Home and not Alexa Skills Kit. Then paste the Skill ID in the correct field. After you added the trigger you will see the overview again and Alexa is displayed as a trigger on the bottom left.

Now copy the Function ANR (blurred out in the above picture) and head over to Alexa Developer Console where we left off. If you are not anymore in configuration part of your skill navigate there starting at the Developer Console and go to the Skills page and click Edit for the previously created skill. Got to SMART HOME and you should see this page.
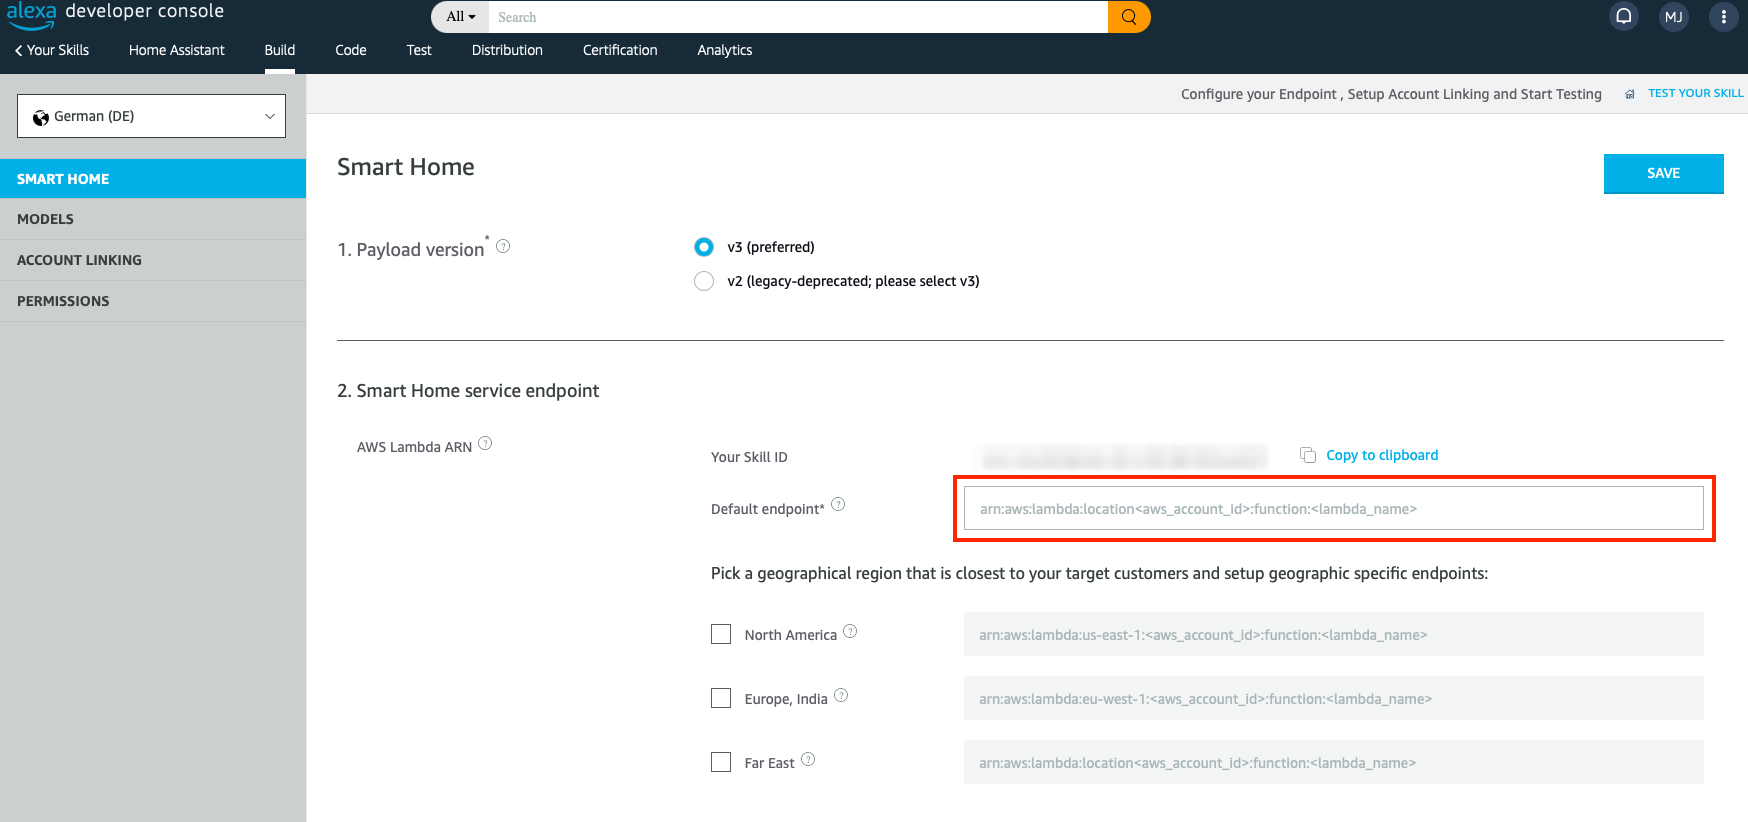
Enter the ANR copied from the Lambda Function into the default endpoint.
Updating the Home Assistant configuration
In our configuration.yaml we need to add the alexa section. In theory you can leave the smart_home section empty, but I suggest to at least put the local and the filter. Without the filter all entities will be exposed to Alexa.
alexa:
  smart_home:
    locale: en-US
    filter:
      include_entities:
        - light.kitchen
    entity_config:
      light.kitchen:
        name: "Custom Name for Alexa"
        description: "The light in the kitchen"
With this example we are only allowing access to one entity. Alexa only has access to to the entity light.kitchen.
Additionally, we can give the entities easier names for Alexa to use. That might make the coordination with voice commands easier or more fluent.
You can check the configuration possibilities at Home Assistant documentation.
Testing the Lambda interface to Home Assistant
Now we heading to the test section in the Lambda function overview.
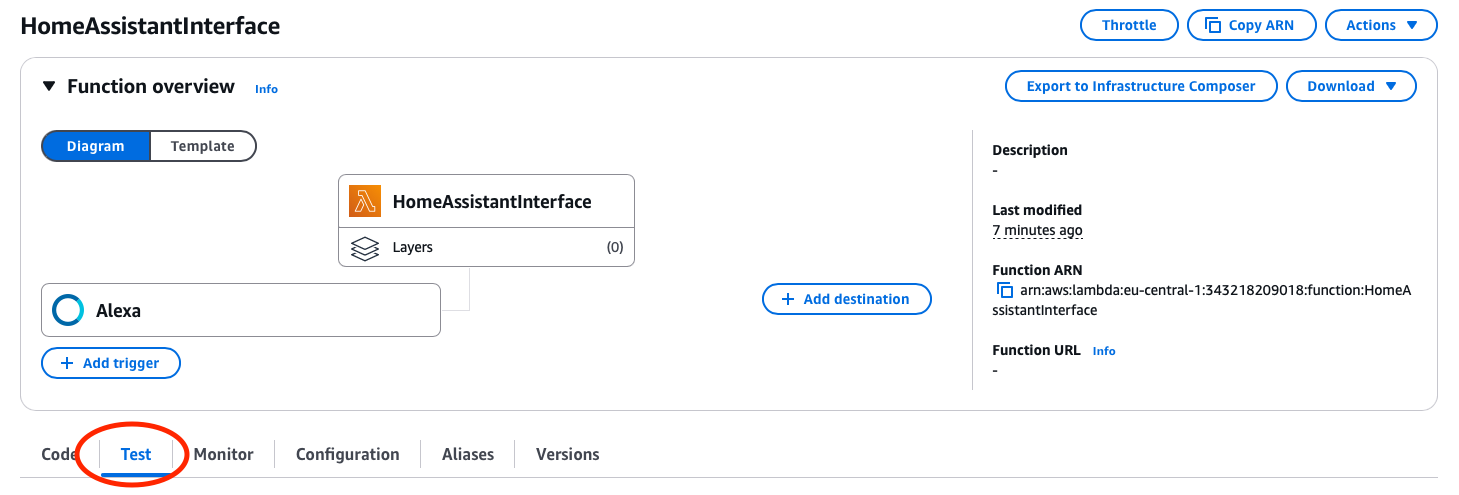
We will create a simple test that is requesting a list of all the devices that can be discover. Since we limited the number of devices in the configuration.yaml to only one device (light.kitchen), we can also verify that only this devices is returned.
We will create a new event and name it Test (you can freely change the name).

In the event json put the following code. It is a simple request for a list of all available devices. Remember to make sure that the DEBUG environment variable is set to True and you set the LONG_LIVED_ACCESS_TOKEN to an active token from Home Assistant.
After you you saved the test and run it by hitting Test, you should habe an output similar to this.

In the Details we can check the payload and see that only one device was transmitted (light.kitchen).
We habe successfully connected the Lambda function with Home Assistant. Now we can remove the environment variables for the token since it should not be needed anymore. Next is connection the Alexa Skill.
Linking Home Assistant and Amazon
First we create a new user in Home Assistant. This its not necessarily needed. However, I prefer to have a clear user separation and not use my personal account for activities that are executed via Alexa. Also this adds an additional level of security if we are limiting the access level of the new user. The credentials will be needed at the end of this section.
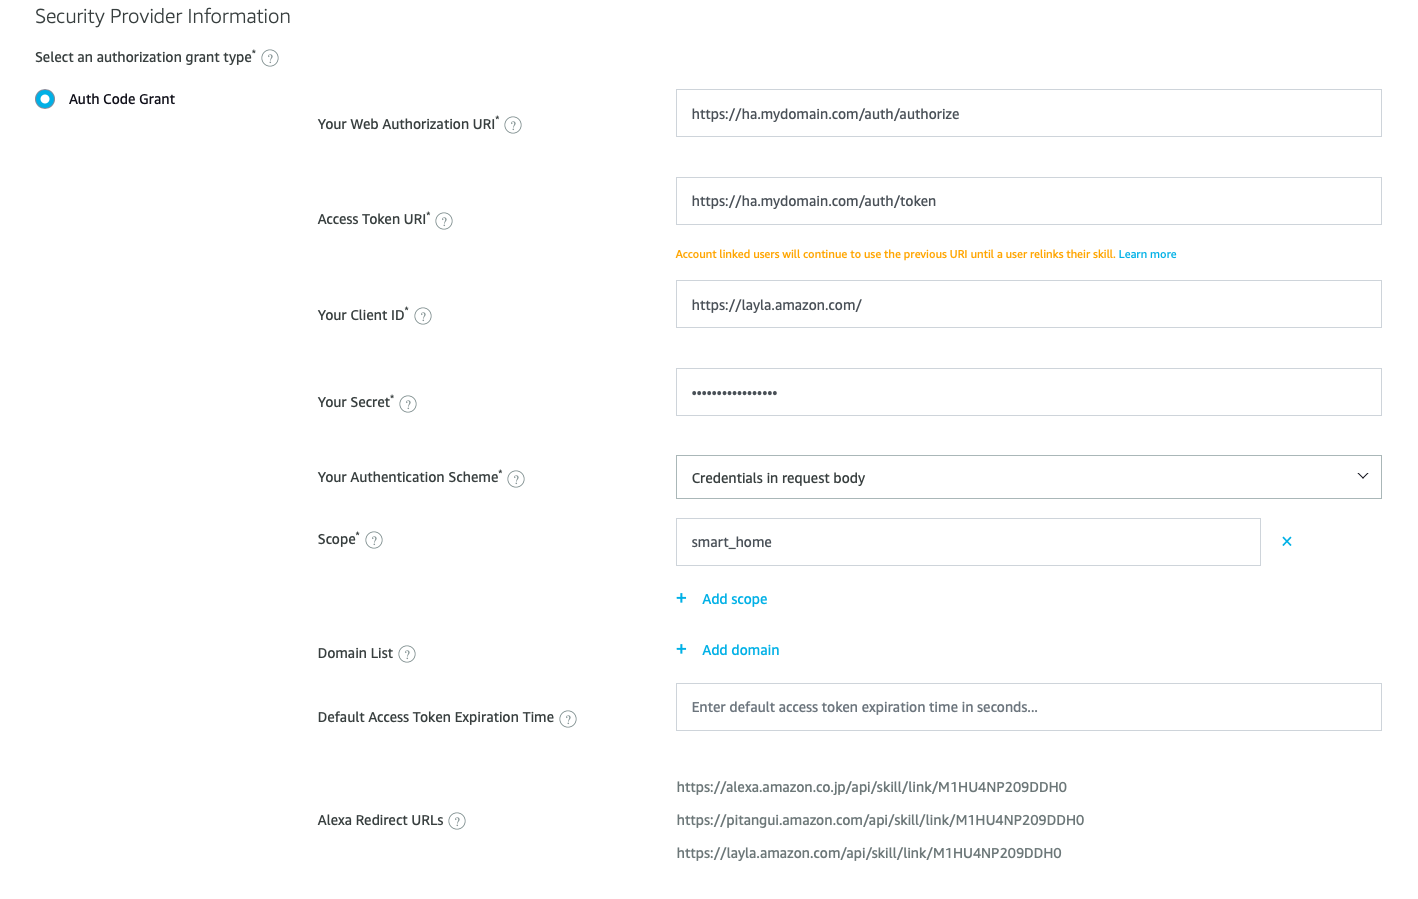
Now we need to go back to the Alexa Developer Console and Edit the ACCOUNT LINKING section of our skill. We will leave the first options as they are.

The inout information must be entered depending on the Home Assistant instance we are running. I filled out the field assuming Home Assistant is accessible via https://ha.mydomain.com. Keep in mind, that you habe to add to port via :PORT if you are not using the default SSL Port (443).

The client ID is again depending on you location.
US or BR: https://pitangui.amazon.com/
EU: https://layla.amazon.com/
JP or AU: https://alexa.amazon.co.jp/
The Client Secret is not used by Home Assistant. Therefore we enter any random string. For the Authentication Scheme we have to select Credentials in request body.
In the scope we have to add the smart_home. This refers to the section we added in the configuration.yaml where we can limit the number of devices that are published and other configurations.
The rest can be left empty as well. The final form should look like this. We are saving with the button top right.
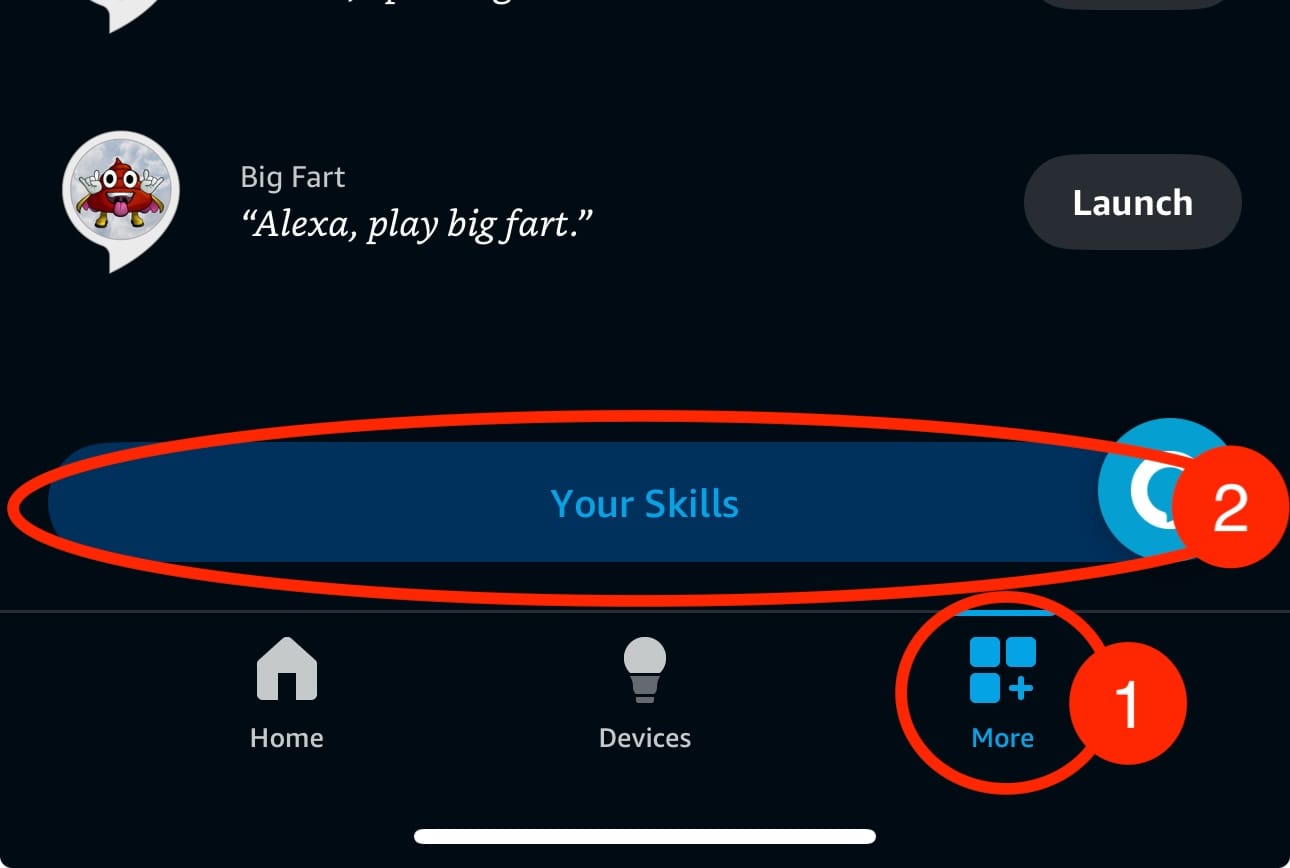
Now we are linking that skill with Alexa via our mobile app. Open the more tab on bottom left go to Skills and Games and scroll to the bottom to open Your Skill.
In our Skill we can select Dev on the top right and then choose the skill we just created. After clicking on it we select ENABEL TO USE. This will open the browser sending us to the login page of home assistant. We can now log into Home Assistant.
After that Alexa will automatically discover the light.kitchen that we allowed previously and we can control that freely via Alexa.
Update list of devices
We will be adding new devices from time to time, so let's check how we can enable them for Alexa.
First, we need to add the devices into the configuration.yaml. We want to add our Living Room light the configuration, so we need to update the filter with light.living_room and add optionally add to the entity_config section.
alexa:
  smart_home:
    locale: en-US
    filter:
      include_entities:
        - light.kitchen
        - light.living_room
    entity_config:
      light.kitchen:
        name: "Custom Name for Alexa"
        description: "The light in the kitchen"
      light.living_room:
        name: "Living Room light"
        description: "The light in the living room"
After that we are restarting the Home Assistant instance. A simple config reload will not work, we have reboot the whole server.
Alexa will not be notified of new devices automatically. We have to start a new discovery in the app. Sadly there no simple "Discover" Button. After opening the devices tab and hitting the + on the top right, we scroll down to add Other devices. None of the listed devices do match Home Assistant so click the link below the logos and tell Alexa our devices require setup in the makers app. Finally we can hit the Discover Devices Button. This will start the search for new devices.

Alternatives
I just want to mention alternatives that could be used to accomplish something similar. I consider those option workarounds. The result might be similar but they are using ways that are not straightforward.
- The Emulated Hue integration emulates a Hue Bridge which is controllable with Alexa. The Hue bridge is acting as an intermediate and is imposing its own limitations and failure possibilities.
- The Homekit integration with Homebridge can be used even if you don't have/use Homekit.
Final Thoughts
The setup is working flawlessly once setup. Some technical knowledge might be needed, but in the end the communication is between HA and Alexa is working and new devices can be added quickly.
Having the option to control all HA devices with Alexa is really a game changer. It opens up a whole lot of more possibilities besides controlling TV or lights. You might add scenes (a la Hue) or controlling of garage door, ventilation or triggering automations.


